Redis集群搭建与简单使用
1.介绍安装环境与版本:
1)Redis使用的是Redis-3.2.8版本。
2)用一台虚拟机模拟6个节点,三个master节点,三个slave节点。虚拟机使用CentOS6.5系统(192.168.0.132)。
2.原理介绍:
Redis cluster在设计的时候,就考虑到了去中心化,去中间件,也就是说,集群中的每个节点都是平等的关系,都是对等的,每个节点都保存各自的数据和整个集群的状态。每个节点都和其他所有节点连接,而且这些连接保持活跃,这样就保证了我们只需要连接集群中的任意一个节点,就可以获取到其他节点的数据。
Redis 集群没有并使用传统的一致性哈希来分配数据,而是采用另外一种叫做哈希槽 (hash slot)的方式来分配的。redis cluster 默认分配了 16384 个slot,当我们set一个key 时,会用CRC16算法来取模得到所属的slot,然后将这个key 分到哈希槽区间的节点上,具体算法就是:CRC16(key) % 16384。所以我们在测试的时候看到set 和 get 的时候,直接跳转到了7001端口的节点。
Redis 集群会把数据存在一个 master 节点,然后在这个 master 和其对应的salve 之间进行数据同步。当读取数据时,也根据一致性哈希算法到对应的 master 节点获取数据。只有当一个master 挂掉之后,才会启动一个对应的 salve 节点,充当 master 。
需要注意的是:必须要3个或以上的主节点,否则在创建集群时会失败,并且当存活的主节点数小于总节点数的一半时,整个集群就无法提供服务了。
3.安装过程:
1)解压并编译安装
#mkdir -p /data/redis/cluster;cd /data/redis //创建环境目录
#tar -zxvf redis-3.2.8.tar.gz //解压安装包
#cd redis-3.2.8/ //进入到Redis源码包
#make && make install //编译并安装
2)将 redis-trib.rb 复制到 /usr/local/bin 目录下,因为 redis-trib.rb 是基于Ruby的,所以还需要安装Ruby。
#cd src;cp redis-trib.rb /usr/local/bin/
#yum -y install ruby ruby-devel rubygems rpm-build //安装Ruby和其依赖
#gem install redis //ruby安装redis依赖
3)创建 Redis 节点
#cd /data/redis/cluster && mkdir {7001..7006}
#cp /data/redis/redis-3.2.8/redis.conf 7001/
#cp /data/redis/redis-3.2.8/redis.conf 7002/
#cp /data/redis/redis-3.2.8/redis.conf 7003/
#cp /data/redis/redis-3.2.8/redis.conf 7004/
#cp /data/redis/redis-3.2.8/redis.conf 7005/
#cp /data/redis/redis-3.2.8/redis.conf 7006/
分别修改六个配置文件:
#vi redis.conf
port 7001 //端口7001,7002,7003,7004,7005,7006
bind 192.168.0.132 //默认ip为127.0.0.1 需要改为其他节点机器可访问的ip 否则创建集群时无法访问对应的端口,无法创建集群
daemonize yes //redis后台运行
timeout 10000 //超时时间
pidfile /var/run/redis_7001.pid //pidfile文件对应7000,7001,7002
cluster-enabled yes //开启集群 把注释#去掉
cluster-config-file nodes_7000.conf //集群的配置 配置文件首次启动自动生成 7000,7001,7002
cluster-node-timeout 15000 //请求超时 默认15秒,可自行设置
appendonly yes //aof日志开启 有需要就开启,它会每次写操作都记录一条日志
appendfsync everysec //aof刷新方式
#save 900 1
#save 300 10
#save 60 10000
rdbcompression yes
dbfilename dump.rdb
loglevel verbose
databases 16
slave-serve-stale-data yes
no-appendfsync-on-rewrite no
auto-aof-rewrite-percentage 100
auto-aof-rewrite-min-size 64mb
slowlog-log-slower-than 10000
slowlog-max-len 1024
#hash-max-zipmap-entries 512
#hash-max-zipmap-value 64
list-max-ziplist-entries 512
list-max-ziplist-value 64
set-max-intset-entries 512
zset-max-ziplist-entries 128
zset-max-ziplist-value 64
activerehashing yes
//重命名危险命令,安全性
rename-command config d6adsfk_config
rename-command slaveof d6adsfk_slaveof
rename-command flushall d6adsfk_flushall
rename-command flushdb d6adsfk_flushdb
##rename-command shutdown d6adsfk_shutdown
注:可以在vi的非编辑模式下使用正则批量替换端口:%s/6379/7001/g enter即可。7002-7006类似,修改对应配置文件的端口即可。
4)启动六个节点:
#/data/redis/redis-3.2.8/src/redis-server /data/redis/cluster/7001/redis.conf &
#/data/redis/redis-3.2.8/src/redis-server /data/redis/cluster/7002/redis.conf &
#/data/redis/redis-3.2.8/src/redis-server /data/redis/cluster/7003/redis.conf &
#/data/redis/redis-3.2.8/src/redis-server /data/redis/cluster/7004/redis.conf &
#/data/redis/redis-3.2.8/src/redis-server /data/redis/cluster/7005/redis.conf &
#/data/redis/redis-3.2.8/src/redis-server /data/redis/cluster/7006/redis.conf &
#ps -ef | grep redis //查看启动的进程

5)创建集群:
#redis-trib.rb create --replicas 1 192.168.0.132:7001 192.168.0.132:7002 192.168.0.132:7003 192.168.0.132:7004 192.168.0.132:7005 192.168.0.132:7006
>>> Creating cluster
>>> Performing hash slots allocation on 6 nodes...
Using 3 masters:
192.168.0.132:7001
192.168.0.132:7002
192.168.0.132:7003
Adding replica 192.168.0.132:7004 to 192.168.0.132:7001
Adding replica 192.168.0.132:7005 to 192.168.0.132:7002
Adding replica 192.168.0.132:7006 to 192.168.0.132:7003
M: 05244e4d6b721a733073b2a1ac7dc9f7a4145522 192.168.0.132:7001
slots:0-5460 (5461 slots) master
M: 5c3ed822213f1675e8e93911a12040f34844cf94 192.168.0.132:7002
slots:5461-10922 (5462 slots) master
M: 982985a7ad0f9b5800fc9315cc051d717bc870df 192.168.0.132:7003
slots:10923-16383 (5461 slots) master
S: 985b7e1b8a1c8e311c5d4ba2df3a455a18a6c2e6 192.168.0.132:7004
replicates 05244e4d6b721a733073b2a1ac7dc9f7a4145522
S: a688a187013bb6c7f22549fadda8eacc9dec6ec4 192.168.0.132:7005
replicates 5c3ed822213f1675e8e93911a12040f34844cf94
S: 550989f26bb0456df068e8d9c1a3476607b91dba 192.168.0.132:7006
replicates 982985a7ad0f9b5800fc9315cc051d717bc870df
Can I set the above configuration? (type 'yes' to accept): yes
>>> Nodes configuration updated
>>> Assign a different config epoch to each node
>>> Sending CLUSTER MEET messages to join the cluster
Waiting for the cluster to join....
>>> Performing Cluster Check (using node 192.168.0.132:7001)
M: 05244e4d6b721a733073b2a1ac7dc9f7a4145522 192.168.0.132:7001
slots:0-5460 (5461 slots) master
1 additional replica(s)
S: a688a187013bb6c7f22549fadda8eacc9dec6ec4 192.168.0.132:7005
slots: (0 slots) slave
replicates 5c3ed822213f1675e8e93911a12040f34844cf94
M: 5c3ed822213f1675e8e93911a12040f34844cf94 192.168.0.132:7002
slots:5461-10922 (5462 slots) master
1 additional replica(s)
S: 550989f26bb0456df068e8d9c1a3476607b91dba 192.168.0.132:7006
slots: (0 slots) slave
replicates 982985a7ad0f9b5800fc9315cc051d717bc870df
S: 985b7e1b8a1c8e311c5d4ba2df3a455a18a6c2e6 192.168.0.132:7004
slots: (0 slots) slave
replicates 05244e4d6b721a733073b2a1ac7dc9f7a4145522
M: 982985a7ad0f9b5800fc9315cc051d717bc870df 192.168.0.132:7003
slots:10923-16383 (5461 slots) master
1 additional replica(s)
[OK] All nodes agree about slots configuration.
>>> Check for open slots...
>>> Check slots coverage...
[OK] All 16384 slots covered.
其中,前三个 ip:port 为master节点,后三个ip:port为slave节点。创建过程中需要输入一次:yes。出现上面输出的信息表示安装成功。
6)验证集群:
连接7002这个master节点进行操作:
#redis-cli -h 192.168.0.132 -c -p 7002
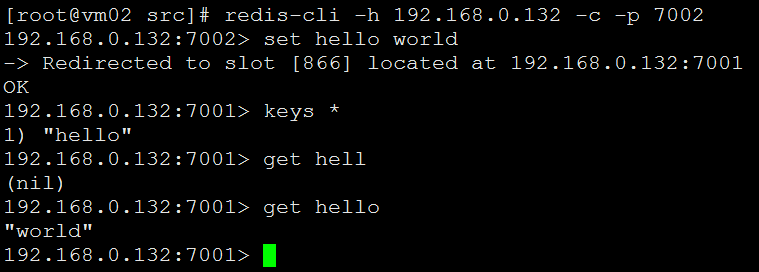
注:set数据和get数据的时候转向时自动完成的,无需用户切换。所以不管连接到哪个节点上进行操作都会返回数据并跳转到该数据分片的节点上。
说明集群运行正常,到此Redis的集群环境和简单实用操作结束。
参考连接:http://www.cnblogs.com/wuxl360/p/5920330.html